
Leveling RV On Uneven Ground: Easy Setup Tips
Use solid blocks, follow a safe order, and never rely on stabilizer jacks to lift an RV.
Leveling RV on uneven ground takes more than placing a few blocks under the tires. The slope, soil, RV type, and leveling system all affect how safely you can create a stable campsite. This guide explains proven methods, common mistakes, useful tools, and safe steps so your RV feels steady without damaging the tires, frame, or leveling equipment.
Why Proper RV Leveling Matters
Leveling an RV improves comfort, safety, and daily function. A level coach helps doors close properly, keeps beds comfortable, and allows refrigerators, sinks, and drains to work as designed.
Many RV refrigerators need to remain close to level during operation. A short stay slightly off level may not cause a problem, but a large or long-lasting tilt can reduce cooling performance and may damage an absorption refrigerator. Always check the leveling limits in your owner’s manual.
Leveling also protects your RV from movement. A coach that rocks when people walk inside can place stress on slide-out rooms, furniture, jacks, and plumbing connections.
When leveling RV on uneven ground, think of the process as building a small, stable platform. The tires support the RV first. Stabilizer jacks then reduce movement. They should not act like lifting cranes.

What to Check Before Leveling
Walk around the campsite before driving into position. Look for soft soil, hidden holes, rocks, tree roots, sharp objects, and drainage channels. A beautiful site can still create a serious leveling problem if one tire sinks after rain.
Check the slope from side to side and from front to back. Side-to-side correction often requires driving one side of the RV onto blocks. Front-to-back correction usually comes from the tongue jack on a travel trailer or the hydraulic system on a motorhome.
Also inspect the overhead space. Tree branches, low wires, signs, and campsite structures can become hazards when you raise a trailer or extend slide-outs.
Before you begin, gather:
• Heavy-duty leveling blocks or interlocking plastic blocks
• Wheel chocks rated for your RV weight
• A long bubble level or electronic level
• A tape measure
• A flashlight for evening arrivals
• A rubber mallet for tight chocks
• A spotter when backing or positioning the RV
Read the RV manufacturer’s instructions before using automatic or hydraulic leveling. Some systems have strict rules about tire contact, jack placement, and maximum extension.

Choosing the Right Leveling Method
The best method depends on your RV. A small travel trailer may need only wheel blocks, a tongue jack, and stabilizers. A large motorhome may use hydraulic or electric leveling jacks, but it still needs a firm surface under each jack foot.
Travel trailers and fifth wheels
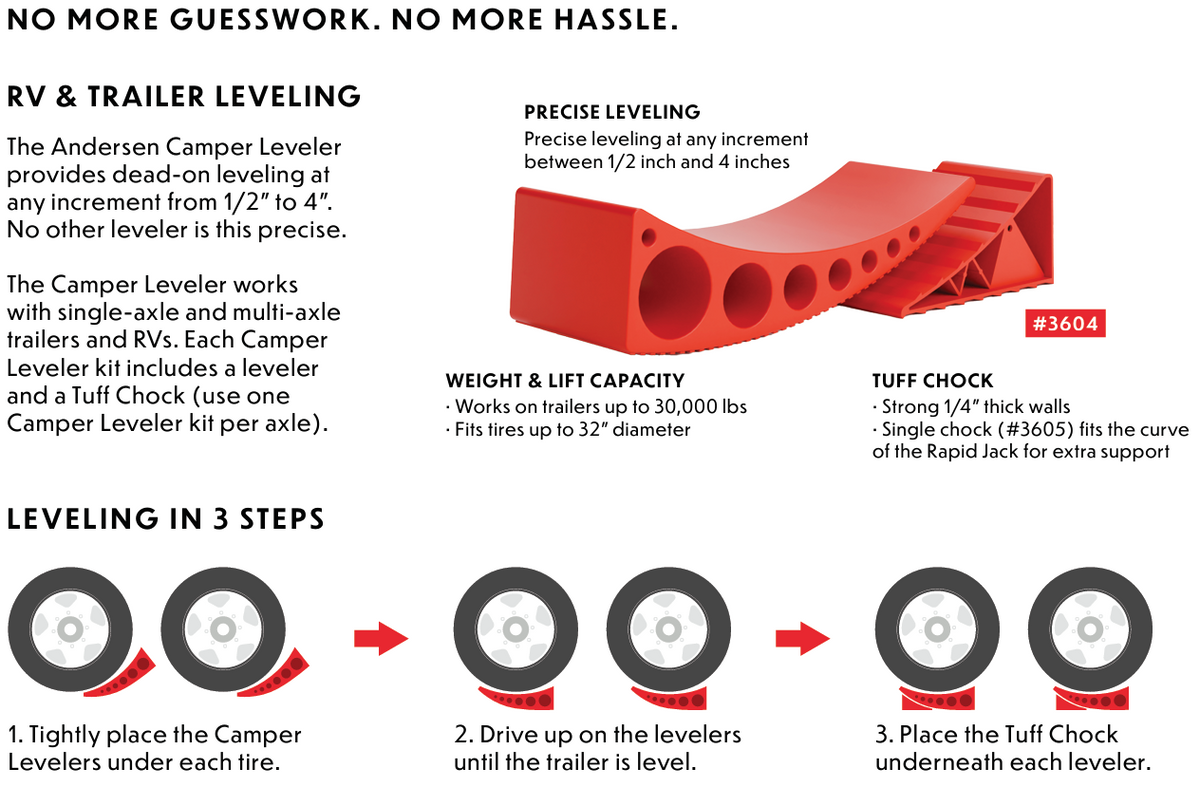
For a trailer, correct the side-to-side angle first. You can do this by placing leveling blocks in front of the low-side tires and slowly driving onto them.
Once the trailer is level from side to side, chock the wheels. Then disconnect the tow vehicle if needed and level the front-to-back angle with the tongue jack or landing gear.
After the trailer is stable, lower the corner stabilizers. Apply firm pressure, but do not use them to lift the trailer tires from the ground.
Class A, Class B, and Class C motorhomes
Motorhomes may use manual, electric, or hydraulic leveling systems. Many automatic systems can handle moderate changes, but they cannot safely correct every slope.
Place jack pads or blocks on firm ground. Keep the tires on the ground unless the manufacturer specifically allows another setup. If a leveling jack needs to extend far beyond its normal range, choose a different site or use approved cribbing.
Class B vans are often easier to position, but their short wheelbase can make small slopes feel more noticeable. A simple set of wheel chocks and leveling blocks may be enough.
Pop-up campers and small trailers
Small campers are light, but they can shift easily. Use wide blocks under the tires and strong wheel chocks. After leveling, lower the stabilizer legs evenly.
Avoid thin wood scraps, loose stones, or objects that can split and slide. A lightweight camper still needs a stable base.

Step-by-Step Guide to Leveling RV on Uneven Ground
Use this sequence whenever possible. Taking a few extra minutes is safer than correcting a poor setup later.
1. Position the RV
Drive the RV onto the site slowly. Keep the easiest exit path in mind. Try to place the RV so the amount of correction is small.
Use a spotter outside the vehicle. Agree on clear hand signals before moving. Never depend only on mirrors or a backup camera when the ground has holes, posts, or nearby people.
2. Measure the side-to-side angle
Place a level inside the RV or use a leveling app as a general guide. A dedicated RV level mounted near the driver’s area can make this step faster.
Check the level in both directions. An app may be useful, but it should not replace the RV manufacturer’s instructions or a physical level.
3. Build a wide ramp
Place leveling blocks in a gradual ramp in front of the tires on the low side. The ramp should be wider than the tire and long enough to prevent a sudden climb.
A gradual ramp is better than one tall block. It reduces tire strain and helps the RV climb smoothly. Stack only blocks that are designed to interlock or support stacking.
4. Drive onto the blocks
Move slowly. Stop when the RV reaches the desired side-to-side level. Keep the steering wheel straight unless the site requires a small correction.
Do not spin the tires. Spinning can dig into soft ground and make the RV less stable.
5. Set the parking brake
For a motorhome, apply the parking brake before leaving the driver’s seat. For a trailer, keep the tow vehicle connected until the trailer is safely chocked and you are ready to disconnect.
6. Chock the wheels
Place chocks tightly against the tires on both sides. If possible, use a pair of chocks that connect across the gap between the tires.
Chocks stop movement. Leveling blocks do not always prevent rolling, especially on wet soil or a slope.
7. Level front to back
For a travel trailer, adjust the tongue jack. For a fifth wheel, adjust the landing gear. For a motorhome, use the approved leveling system.
Make small adjustments. Large, fast movements can shift the RV or overload a jack.
8. Lower the stabilizers
Lower the stabilizer jacks until they contact solid blocks or pads. Extend them evenly. They should reduce rocking, not carry the full weight of the RV.
If the RV rises noticeably when you lower a stabilizer, stop and reset it. That may indicate excessive pressure or poor support.
9. Recheck the level
Walk inside and check the floor, kitchen counter, or refrigerator area. Then inspect the tires, blocks, chocks, and jack feet.
Open and close the entry door. Check slide-out clearance before extending slides. If the RV shifts, retract the slides and correct the setup.

How to Level an RV on a Side Slope
Side slopes are often the most challenging because the low-side tires may need several inches of lift. The safest solution is usually to place approved leveling blocks under the low-side tires.
Build the blocks like a short staircase. Each layer should sit flat, and the top surface should support the full tire tread. Never place a single narrow block under only part of a tire.
If the slope is too steep, do not keep adding blocks until the RV appears level. A tall stack can tip, crack, or slide. Choose a different site or ask the campground host for a safer location.
When leveling RV on uneven ground, tire support should remain broad and even. A tire resting on the edge of a block is not properly supported.
How to Level an RV Front to Back
Front-to-back leveling is usually easier. Travel trailers use the tongue jack, while fifth wheels use their landing gear. Motorhomes use their built-in jacks or leveling system.
Keep the tow vehicle connected while making the first side-to-side correction. After the trailer is chocked, disconnect the tow vehicle and adjust the tongue height.
Never place a tongue jack on bare soft soil. Use a wide jack pad or a solid block designed for the jack. A small foot can sink quickly under the trailer’s weight.
For a fifth wheel, keep the landing gear square and supported. If the front legs extend too far, add approved blocks beneath them. Shorter jack extension usually provides better stability.

Safe Blocks and Support Materials
The right support material is as important as the leveling technique. The material must handle the load without crushing, splitting, or sliding.
Good choices include:
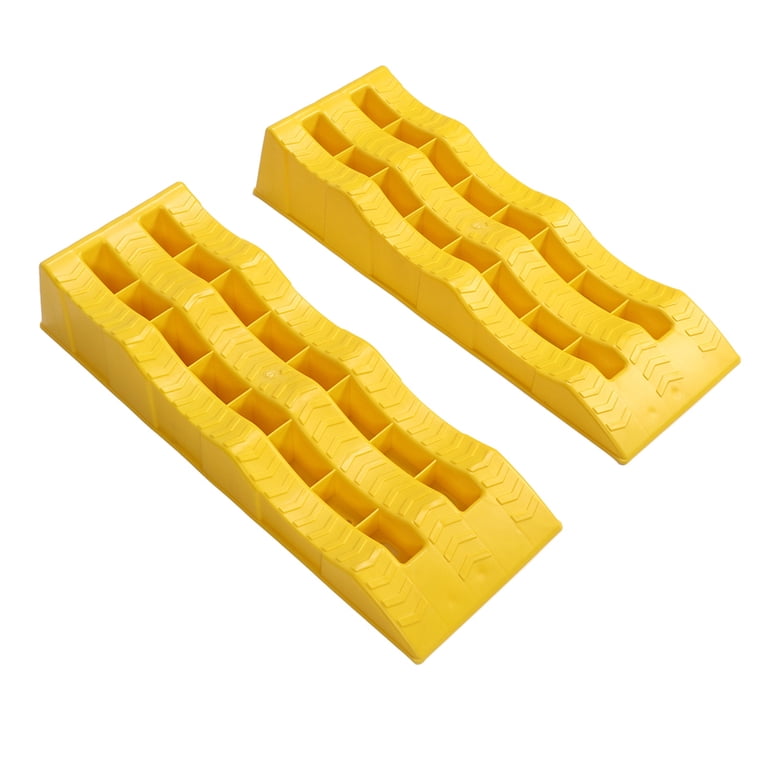
• Commercial RV leveling blocks made for stacking
• Heavy-duty jack pads
• Pressure-treated lumber in sound condition
• Solid, wide wood boards with no cracks
• Approved plastic or composite support pads
Avoid:
• Loose rocks
• Bricks that can fracture
• Thin plywood
• Wet or rotten wood
• Scrap pieces with nails or sharp edges
• Small blocks that support only part of a tire
Wood can work well, but it absorbs moisture and may rot over time. Plastic blocks are lighter and easier to clean, but they can crack in very cold weather or under loads beyond their rating.
Keep the weight rating in mind. A motorhome may weigh many thousands of pounds, and the load is not always divided evenly among the wheels or jacks.

Using Automatic RV Leveling Systems
Automatic leveling systems are convenient, but they do not remove the need for judgment. The system may level the RV while placing a jack on weak soil or extending a jack farther than is wise.
Before pressing the automatic button:
• Close cabinet doors and secure loose items
• Confirm that all people are outside the RV if the manual requires it
• Check that the tires have clear space
• Place jack pads on firm ground
• Make sure slides are retracted unless the manual says otherwise
• Look for obstacles around every jack
Watch the system while it works. Listen for unusual sounds and stop if the RV moves sharply, one tire lifts, or a jack sinks.
Automatic leveling should be viewed as a tool, not a substitute for site inspection. When leveling RV on uneven ground, the operator remains responsible for the surface and the final result.
Stabilizing the RV After Leveling
Leveling and stabilizing are different tasks. Leveling changes the angle of the RV. Stabilizing reduces motion after the RV reaches the correct angle.
For a trailer, lower the stabilizer jacks at the corners. Place pads under them to spread the load. Lower each jack until it contacts the pad, then apply light pressure.
Do not use stabilizers to raise a tire off the ground. Doing so can bend the frame, damage the jack, or shift the trailer.
A wheel lock or X-chock can reduce movement between tandem trailer tires. Use it only as directed by the product maker, and do not treat it as a replacement for standard wheel chocks.
Inside the RV, avoid leaving heavy items on a slide-out while it is extended if your owner’s manual warns against it. Large slides can change the load on the frame and suspension.

Common Mistakes to Avoid
Many leveling problems come from rushing. These mistakes are easy to prevent.
Using stabilizers to lift the RV
Stabilizers are designed to limit movement. They are not primary lifting devices. Lifting the RV with them can cause frame damage or make the trailer unstable.
Skipping wheel chocks
Even a level RV can roll. Chock the wheels before disconnecting a trailer or walking away from the driver’s seat.
Building a narrow block stack
A narrow stack can tip sideways. Use blocks that fully support the tire and create a stable, wide base.
Leveling on soft ground
Grass, sand, mud, and wet soil can hide weak support. A jack may look stable at first and then sink as weight remains on it.
Extending slides too early
A slide-out changes the balance of the RV. Level the coach first, then follow the manufacturer’s slide-out procedure.
Trusting an app alone
A phone level can help, but cases, magnetic fields, uneven floors, and calibration errors can affect readings. Compare it with a physical RV level.
Leaving the refrigerator unchecked
If the refrigerator is far off level, correct the RV position before running it for long periods. Follow the refrigerator manual for acceptable limits and operating rules.
My Practical Lessons From Uneven Campsites
One lesson I learned early is that the first parking position is rarely the best one. Moving the RV a few feet can reduce the number of blocks needed and make the whole setup safer.
I once chose a site that looked almost flat from the entrance. After stepping inside, I found a clear side tilt and a soft low corner. Rather than build a tall stack, I repositioned the RV, used shorter blocks, and gained a much firmer base.
Another useful lesson is to level before unpacking. If you put out chairs, connect utilities, and extend slides first, a correction becomes slow and frustrating.
My simple routine is to pause after each major step. I check the level after driving onto blocks, again after front-to-back adjustment, and once more after lowering the stabilizers. That small habit catches movement before it becomes a bigger problem.
Leveling RV on Uneven Ground in Rain, Sand, or Gravel
Different surfaces need different care. Rain can turn firm soil into mud, while sand can allow blocks and jack pads to sink. Gravel may look strong but shift under a concentrated load.
On soft ground, use larger support pads to spread the weight. Inspect the pads during setup and again after several hours. If they sink, retract the system safely and rebuild the support.
On gravel, clear loose stones from under jack pads. A flat pad should sit on the most compact area. Avoid placing a jack on an unstable mound.
In cold weather, check for frozen ground that may thaw during the day. In hot weather, asphalt can soften under heavy loads. These conditions make a wide support base even more important.
If water flows toward the RV, do not use blocks to solve the drainage problem. Move to higher ground when possible. A level RV is not useful if water enters through the door or collects beneath the chassis.
When You Should Not Level the RV Yourself
Some sites are too steep or too unstable for normal leveling blocks. Stop and ask for help if:
• A tire would need to climb a very tall stack
• A jack must extend near its maximum limit
• The ground is muddy, flooded, or collapsing
• The RV frame twists or the door binds badly
• A tire loses contact with the ground
• The blocks shift while you drive onto them
• You hear cracking, popping, or metal strain
• You cannot keep the RV safely chocked
A campground host may know which sites handle large RVs better. A professional RV technician can inspect a jack, frame, or suspension problem if the coach will not level normally.
Do not improvise with a car jack, unstable rocks, or homemade supports that do not match the RV’s weight. The cost of moving sites is small compared with the cost of a damaged frame or a runaway trailer.
A Simple Leveling Checklist
Save this checklist on your phone or print it for the RV.
-
Inspect the ground, slope, drainage, and overhead clearance.
-
Position the RV with a spotter.
-
Measure side-to-side level.
-
Place wide blocks under the low-side tires.
-
Drive onto the blocks slowly.
-
Apply the parking brake or keep the tow vehicle connected.
-
Chock all wheels firmly.
-
Level front to back.
-
Place pads under jacks and stabilizers.
-
Lower stabilizers without lifting the tires.
-
Recheck the level inside and outside.
-
Extend slide-outs only after the RV is stable.
-
Recheck the setup after rain, strong wind, or several hours of use.
This process may take a few extra minutes, but it creates a much safer and more comfortable campsite.
Frequently Asked Questions About Leveling RV on Uneven Ground
Can I level an RV with the stabilizer jacks?
No. Stabilizer jacks are meant to reduce movement after the RV is level. Use leveling blocks, the approved hydraulic system, or the tongue jack for primary leveling.
Should all RV tires stay on the ground?
In most cases, yes. Keeping the tires on firm ground improves stability and supports the suspension. Follow your RV manufacturer’s instructions because some leveling systems have specific procedures.
How many leveling blocks do I need?
The number depends on the slope, RV weight, and block design. Carry enough blocks to create wide, stable support on both tires and jacks rather than relying on one tall stack.
Can I use wood blocks under an RV?
Yes, sound and properly sized wood can work under tires, jacks, or stabilizers when it is rated and placed on firm ground. Do not use cracked, rotten, narrow, or slippery pieces.
Is it safe to run the refrigerator when the RV is not level?
A small, temporary angle may be acceptable for some refrigerators, but a large or prolonged tilt can cause problems, especially with absorption models. Check the refrigerator manual and level the RV before extended operation.
Should I level the RV before extending the slide-outs?
Usually, yes. Level and stabilize the RV first unless the RV manufacturer gives different instructions. Extending slides on an unstable coach can increase movement and place extra stress on the structure.
What should I do if the RV keeps rocking?
Check the wheel chocks, jack pads, stabilizers, and block stacks. Make sure the stabilizers are on firm support and that the tires remain properly supported.
Conclusion
Leveling RV on uneven ground is safest when you inspect the site, correct the low side with wide blocks, chock the wheels, and use jacks only for their intended purpose. A stable base protects your RV, improves comfort, and reduces strain on the frame, tires, refrigerator, and leveling equipment.
Take your time, make small adjustments, and recheck the setup after extending slides or changing weather conditions. Practice this routine at home before your next trip, then share your favorite RV leveling tips or explore more RV safety resources for confident camping.


