How To Build Wood RV Leveling Blocks: Easy DIY Guide
Build sturdy wood RV leveling blocks with treated lumber, safe cuts, and a design matched to your RV’s weight and tires.
Learning how to build wood RV leveling blocks can save money and make campsite setup much easier. The right blocks create a broad, stable base under your RV tires or leveling jacks, while poor blocks can split, slide, or fail under heavy weight. This guide explains material choices, measurements, cutting steps, safe use, storage, and common mistakes so you can build a reliable set with confidence.
Why Build Your Own Wood RV Leveling Blocks?
Store-bought RV leveling blocks are convenient, but they can cost more than expected when you need many blocks for a large motorhome or travel trailer. Wood blocks are often less expensive and easy to repair or replace.
A homemade set also lets you choose the size, height, and shape. A small camper may need simple flat pads. A heavy motorhome may need wide, layered platforms that spread weight across the ground.
The main benefits include:
• Lower cost when you already have basic tools
• Custom sizes for your RV tires, stabilizer jacks, or leveling jacks
• Easy repairs if a block becomes damaged
• Better weight distribution on soft or uneven ground
• Simple storage in a front compartment, truck bed, or storage box
Wood RV leveling blocks are not a replacement for wheel chocks, jack stands, or the RV manufacturer’s leveling method. They help raise and support a vehicle, but every part must be used as intended.

How Wood RV Leveling Blocks Work
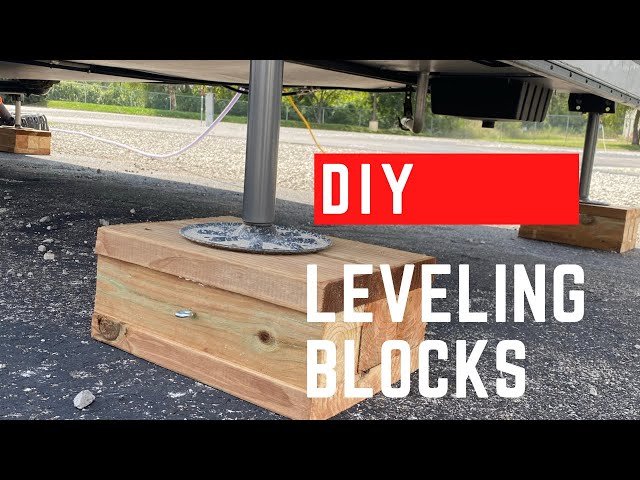
An RV leveling block creates a firm platform between the tire, jack foot, or ground. It spreads force over a larger area and reduces how deeply the support point sinks into soil, gravel, or wet grass.
Think of the block as a snowshoe for your RV. A wider surface spreads the load instead of allowing one small point to press into the ground.
Wood RV leveling blocks can serve several purposes:
• Tire leveling blocks raise one side of an RV to reduce side-to-side tilt.
• Jack pads create a wider base under stabilizer or leveling jacks.
• Ramp-style blocks help a tire climb to a chosen height.
• Layered platforms provide extra height on sloped campsites.
Your RV owner’s manual should always guide the placement of jacks and the amount of lift. Never use a homemade block to lift a tire farther than the RV system allows. A level camper is useful, but stability and safety come first.

Choosing the Right Wood
The best wood for RV leveling blocks is strong, dry, and free from major defects. Pressure-treated lumber is a common choice because it handles moisture better than untreated boards.
Use lumber rated for outdoor ground contact when blocks may sit on damp soil. Outdoor-rated wood still needs inspection, since treatment does not prevent splitting, crushing, or decay forever.
Good choices include:
• Pressure-treated Southern yellow pine
• Pressure-treated Douglas fir
• Sound construction-grade fir
• Dense hardwood for smaller jack pads
Avoid boards with large knots, deep cracks, rot, insect damage, or severe warping. A small surface mark may be harmless, but a crack that runs across the board can become a failure point.
For most campers, 2×6 or 2×8 boards work well for tire ramps and flat pads. A large motorhome may need 2×8 or 2×10 boards, depending on the tire width and the design. Remember that actual lumber is smaller than its stated size. A “2×8” board is usually about 1 1/2 inches thick and 7 1/4 inches wide.
Let wet lumber dry before building when possible. Damp boards may shrink after cutting, and wet wood can be harder to seal and inspect.

Materials and Tools You Need
The exact materials depend on your design, but a basic set of wood RV leveling blocks can be built with common workshop tools.
Materials:
• Pressure-treated 2×6, 2×8, or 2×10 lumber
• Exterior-rated wood screws
• Exterior wood glue, if desired
• Exterior wood sealer or preservative
• Sandpaper or a sanding block
• Reflective tape or bright paint for visibility
• Optional rope handles or webbing straps
Tools:
• Measuring tape
• Pencil and square
• Circular saw or miter saw
• Drill and driver bits
• Clamps
• Safety glasses and hearing protection
• Work gloves
Choose exterior-rated screws that are long enough to hold the layers together without extending through the bottom. Screws are usually easier to inspect and replace than nails.
Do not rely on glue alone. Ground moisture, vibration, and heavy loads can weaken a glued joint over time. Mechanical fasteners should carry the main load.

Planning the Size and Load
Before cutting, measure your RV tires and jack feet. The block should be wider than the part resting on it and long enough to provide a stable surface.
For a tire block, measure:
-
Tire width
-
Available space around the tire
-
Desired lift height
-
Ramp length, if the tire will drive onto the block
For a jack pad, measure the diameter or width of the jack foot. The block should extend beyond the foot on every side.
A practical rule is to make the block at least 2 inches wider than the tire or jack foot on each side when space allows. More width can improve stability, especially on loose ground.
The total load is not always shared evenly. When one side of an RV is raised, that side may carry a significant portion of the vehicle weight. Dynamic forces from driving onto a ramp can also be greater than the parked load.
Because of this, avoid designs that depend on one thin board or a single screw. Use several layers when you need more height, and arrange the grain direction and joints to reduce weak spots.
Three Useful Wood RV Leveling Block Designs
Different RVs need different block styles. A simple flat pad may work for a stabilizer jack, while a tire may need a ramp or stepped platform.
Flat layered pads
Flat pads are the easiest design. Cut several equal pieces of lumber and screw them together in layers.
These pads work well under:
• Stabilizer jacks
• Leveling jack feet
• Trailer tongue jacks
• Small tire support platforms
Stagger the seams between layers. This is similar to brickwork: a joint in one layer should not line up with a joint in the next layer.
Stepped leveling blocks
A stepped block uses several boards with different lengths. The bottom layer is the longest, and each upper layer is shorter.
This design creates a small staircase for a tire. It can provide more grip than a smooth ramp and is easier to build with straight cuts.
A stepped block may have three or four levels. Keep each step wide enough for the full tire tread. Add a raised stop at the back if your design requires it, but do not create a sharp edge that could damage the tire.
Ramp-style blocks
A ramp uses a sloped top surface or several boards arranged to form a gradual climb. It is useful when you want to drive onto the block rather than place it beneath a lifted tire.
A gentle ramp is easier to use and places less sudden force on the block. The ramp should have enough length to avoid a sharp bump.
Add a stop only if it can be used safely. A stop that is too tall may contact the tire sidewall or create a sudden impact.

How to Build Wood RV Leveling Blocks Step by Step
This method creates strong, layered blocks for many travel trailers and motorhomes. Adjust the dimensions to suit your RV and the available campsite space.
Step 1: Measure the tire or jack foot
Measure the widest part of the tire tread or the footprint of the jack foot. Add extra width for stability.
For example, if a tire is about 8 inches wide, a block around 12 inches wide gives useful side clearance. The final size depends on your RV, storage space, and how much ground is available.
Step 2: Choose the block height
Decide how much lift you need. One layer of 2× lumber gives about 1 1/2 inches of height. Two layers provide about 3 inches, before compression or ground settling.
Do not build a very tall stack from loose pieces. A tall stack can shift. It is usually safer to build one connected platform or use approved leveling equipment for greater height.
Step 3: Mark equal cuts
Use a square to mark straight lines. Equal pieces create a more stable block and prevent rocking.
For a flat pad, cut several boards to the same length. A length between 12 and 18 inches works for many applications, but larger RV tires may need more length.
Step 4: Cut the boards
Cut slowly and keep both hands in safe positions. Support long boards so they do not pinch the saw blade.
Wear eye protection because pressure-treated wood can produce sharp chips. Keep children and pets away from the cutting area.
Step 5: Test-fit the layers
Place the pieces on a flat surface and check for rocking. Turn boards in different directions to find the most stable arrangement.
Stagger each layer. For example, place the top boards across the lower boards when the design allows. This spreads the load and reduces the chance of a seam becoming a failure line.
Step 6: Drill pilot holes
Drill pilot holes before installing screws, especially near board ends. Pilot holes reduce splitting and help the screws pull the layers together.
Keep screws away from large knots and cracked areas. If a board splits during drilling, replace it rather than hoping the screw will hold it closed.
Step 7: Fasten the layers
Use exterior-rated screws at several points across the block. Do not place every screw in one straight line.
The screws should pull the boards together without crushing the wood. Stop when the screw head is flush or slightly below the surface.
Step 8: Sand sharp edges
Round or smooth the corners and edges. Sharp corners can cut hands, damage storage bags, or catch on gravel.
Pay special attention to the top surface. Remove splinters that could damage a tire or jack foot.
Step 9: Seal and mark the blocks
Apply an exterior wood sealer to cut ends and exposed surfaces. End grain absorbs water quickly, so it deserves extra attention.
Paint the blocks a bright color or add reflective tape. A dark block can disappear under an RV at night, especially on gravel.
Step 10: Inspect before use
Look for loose screws, splits, twisting, rot, and crushed wood. Place the finished block on firm ground and test it by pressing down on it before putting it under the RV.
If it rocks without a load, it will not become safer under a load. Correct the problem first.
How to Use Wood RV Leveling Blocks Safely
Building strong wood RV leveling blocks is only half the job. Correct placement matters just as much.
Follow these steps:
-
Park on the firmest area available.
-
Keep the RV aligned with the planned leveling direction.
-
Apply the parking brake.
-
Use wheel chocks before adjusting height.
-
Place the blocks on stable ground.
-
Drive or lower the RV onto the blocks according to the RV system instructions.
-
Check that the tire or jack foot sits fully on the block.
-
Confirm that the block remains flat and does not sink.
-
Make small leveling adjustments.
-
Recheck the chocks, blocks, and jacks before entering the RV.
Never crawl beneath an RV supported only by a jack or wood block. Use support equipment approved for the vehicle if underbody access is needed.
Do not use leveling blocks to correct a dangerous slope. If the campsite requires a very tall stack, find a better site or use equipment designed for that lift.
Important Safety Limits and Risks
Wood RV leveling blocks can be useful, but they have clear limits. Wood can split, crush, absorb water, and slide on smooth surfaces.
Watch for these risks:
• The block is narrower than the tire or jack foot.
• The ground is soft, muddy, or sloped.
• The block has a crack across its width.
• Several loose blocks are stacked without connection.
• The RV drives onto the block too quickly.
• The tire only partly rests on the platform.
• The jack foot sits near an edge.
• The block has rot, oil damage, or crushed fibers.
• The block is used as a substitute for a jack stand.
RV manufacturers often provide specific leveling instructions because suspension parts, frames, tires, and jacks have different limits. Follow those instructions before relying on a homemade design.
A block may look solid and still fail. The danger is not only breakage. A sliding block can move the RV suddenly, which is why chocks and a firm surface are essential.
Common Mistakes to Avoid
The most common mistake is building for appearance instead of load direction. A neat block with weak grain, poor screws, or narrow support is not a safe block.
Avoid these errors:
Using untreated scrap wood
Untreated wood can work in dry conditions, but repeated contact with wet ground shortens its life. Pressure-treated lumber is usually a better choice for outdoor use.
Making the block too small
A small block may save storage space, but it leaves little room for movement or uneven ground. A wider platform gives you a better safety margin.
Relying on one board
One board can split or curl. Layered construction spreads force and gives the block more resistance to bending.
Ignoring end grain
Cut ends absorb water quickly. Seal them and inspect them often.
Building a tall loose stack
Loose layers can slide or tilt. Connect the layers or use a purpose-built leveling system for greater height.
Forgetting storage
Wet blocks stored in a closed compartment may stay damp and begin to rot. Let them dry before storage and keep them off standing water.
Skipping a test fit
Test each block with the actual tire or jack foot. A design that looks right on a workbench may not fit well under the RV.
How to Maintain and Store the Blocks
Inspect wood RV leveling blocks before every trip. Look for cracks, screw heads that have backed out, soft spots, and signs of water damage.
Keep a small repair kit with:
• Exterior screws
• A cordless drill
• A screwdriver bit
• Sandpaper
• Wood preservative
• Work gloves
Allow blocks to dry after use. Brush off gravel and dirt before placing them in storage.
Store the blocks where air can move around them. Avoid sealing damp blocks in a plastic bag for long periods. A breathable storage tote or ventilated compartment can help.
Replace a block when damage affects its shape or strength. Do not try to repair a major split with glue alone. The cost of new lumber is small compared with the damage caused by a failed support.
A Practical Example for a Travel Trailer
Imagine a midsize travel trailer parked on a campsite that slopes slightly from left to right. The goal is to raise the low side by about 3 inches.
A useful setup may include:
• Two wide stepped blocks under the low-side tires
• One flat pad under each stabilizer jack
• Wheel chocks on both sides of the tires
• A level check after the trailer is positioned
The tire blocks should be long enough for the full tread and wide enough to leave side clearance. The stabilizer pads should spread the jack load but should not be used to lift the trailer frame beyond the manufacturer’s instructions.
After positioning the trailer, check the level inside the living area. Then walk around the outside and inspect each block. Look for sinking, rocking, or partial contact.
This simple inspection often catches problems before they become stressful. A few extra minutes can prevent a late-night adjustment in rain or darkness.
When Commercial Blocks Are a Better Choice
Homemade wood RV leveling blocks are not right for every owner. Commercial products may be better when you need a lightweight kit, quick setup, or a design tested for repeated use.
Choose commercial blocks when:
• You travel often and need fast setup
• You have limited storage space
• You need a very precise leveling height
• You prefer interlocking parts
• You camp on very wet or unstable ground
• Your RV is large and extremely heavy
Wood blocks are heavy and can take up valuable storage space. They may also become slippery when wet. Their main strengths are low cost, custom sizing, and repairability.
A mixed setup can work well. Some owners use commercial tire ramps and homemade wood pads for jack feet. The best choice depends on your RV manual, camping style, storage space, and comfort with regular inspections.
Frequently Asked Questions About How to Build Wood RV Leveling Blocks
What is the best wood for RV leveling blocks?
Pressure-treated lumber rated for outdoor or ground contact is a practical choice. Select straight boards without deep cracks, rot, large knots, or crushed areas.
How thick should wood RV leveling blocks be?
A single 2× board is about 1 1/2 inches thick, while two layers provide about 3 inches. Use layered construction for strength, but avoid tall stacks of loose boards because they can shift.
Can I use wood blocks under RV tires?
Yes, wood blocks can support RV tires when they are wide, stable, and long enough for full tread contact. Use wheel chocks and make sure the tire does not sit near an edge.
Can I use wood RV leveling blocks under stabilizer jacks?
Yes, wide wood pads can spread the load under stabilizer jacks. They should support the jack foot without being used to lift the RV beyond the limits stated in the owner’s manual.
Should I seal homemade RV leveling blocks?
Sealing helps slow moisture absorption, especially on cut ends. It does not make damaged or weak wood safe, so inspect the blocks before each use.
How many leveling blocks do I need?
The number depends on your RV and setup. Many trailers need blocks under two tires and one pad under each jack, but your owner’s manual and campsite slope should determine the final arrangement.
Can I stack wood RV leveling blocks?
You can connect layers into one solid platform, but avoid stacking many loose blocks. A tall, unconnected stack may tilt, slide, or collapse under uneven force.
How long do wood RV leveling blocks last?
Their life depends on wood type, moisture, load, and storage. Dry, treated blocks may last for years, but replace them sooner if they split, soften, warp, or show serious decay.
Conclusion
Learning how to build wood RV leveling blocks is a simple project with a real payoff. Use sound pressure-treated lumber, make the blocks wider than the tire or jack foot, stagger and fasten the layers, smooth the edges, and seal the cut ends.
Safe use matters as much as solid construction. Chock the wheels, follow the RV manual, avoid tall loose stacks, and inspect every block before loading your camper onto it. Build a test set first, check how it fits your RV, and improve the design before making a full kit.
With careful measurements and regular maintenance, your homemade blocks can make uneven campsites easier to handle. Gather your materials, build one sturdy prototype, and share your results or questions with fellow RV owners.